Basic Python Syntax - Introduction to Syntax and Operators
Basic Python syntax ... This is where you get started if you want to learn Python programming ... which would allow you to elaborate large quantities of data in the blink of an eye ... build really smart machine learning algorithms ... and earn north of $130,000 eventually...
Wow. Let's not get ahead of ourselves though. Learning basic Python syntax will be like laying the first brick.
In this post, you will learn the fundamentals of Python syntax, and then in the next one, we’ll be able to dive into some interesting programming tasks.
All right. Ready?
Here's a breakdown of the useful Python syntax we will cover in this article:
- The Double Equality Sign
- Reassign Values
- Add Comments
- Line Continuation
- Indexing Elements
- Structure Your Code with Indentation
- Arithmetic Operators
- Comparison Operators
- Logical "Boolean" Operators
- Identity Operators
The Double Equality Sign
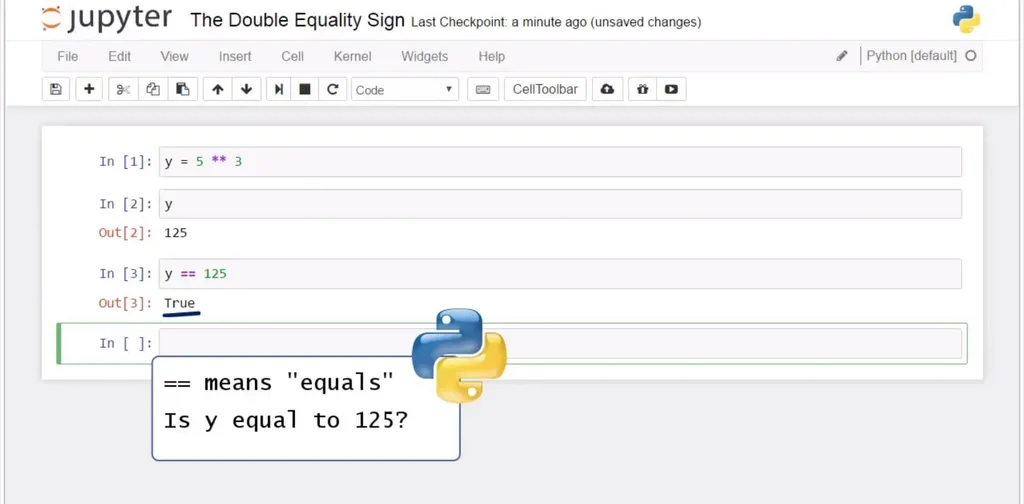
You know the right way to interpret the equals sign when programming is “assign” or “bind to”. For instance, “assign 5 to the power of 3 to the variable y”; “bind 5 to the power of 3 to y”. This means from that moment further, for the computer, y will be equal to 125.
Here is what will happen when you double the equality sign.
If we type “y, double equality sign, 125”. The correct way to read this code is “y equals 125”. When you run this command, the computer will assume you have requested an answer to the question, “Is y really equal to 125?” This is why, after the execution of this cell, the machine will respond with a Boolean value – it will either return “True” or “False”.
Basic Python Syntax - The Double Equality Sign
Let’s check our output when we try to verify if y is equal to 126. Great! The machine replied with “False” because 125 and 126 are different numbers. Wonderful!
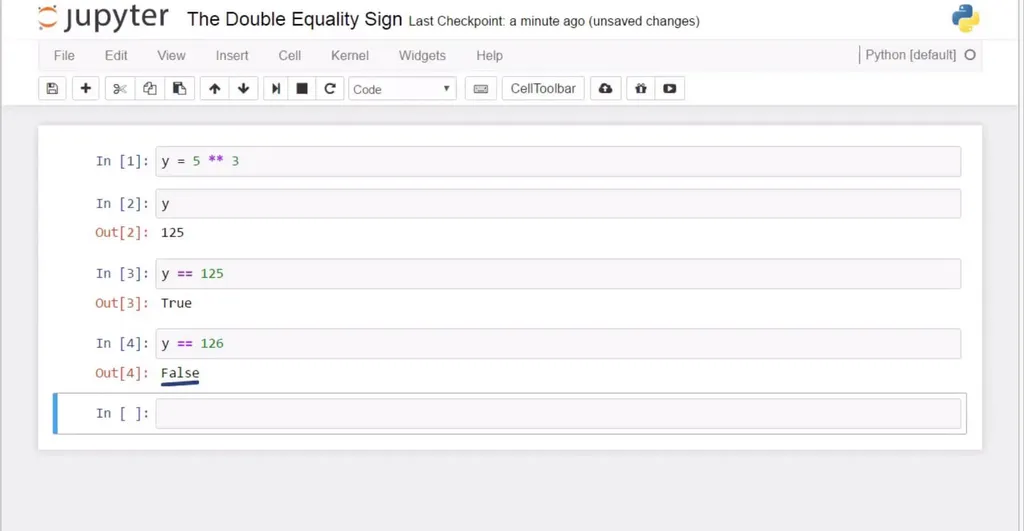
Remember – when you mean equality between values and not assignment of values in Python, you’ll need the double equality sign. Anytime you use it, you will obtain one of the two possible outcomes – “True” or “False”.
Next, we will show you how to reassign values in Python.
Reassign Values
Ok, let me explain a basic Python syntax idea that is valid for other programming languages, as well. If I assign the value of 1 to a variable z, my output after executing z will be 1. After that, if I assign 3 to the same variable z, z will be equal to 3, not 1 anymore.
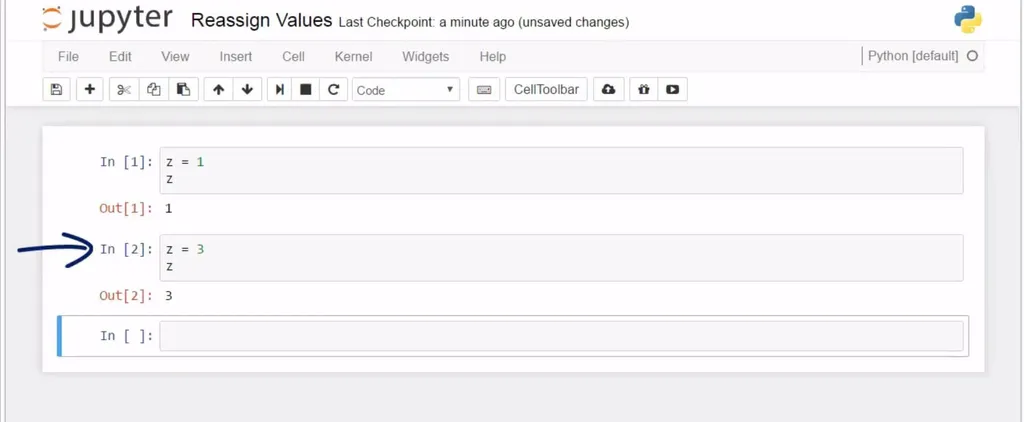
Basic Python Syntax - Reassign Values
How come?
Well, the order of commands matters. Initially, we said z will be equal to 1, and that was true until we changed the value to 3. For the computer, from that moment on, z is not equal to 1, and it will continue to be 3. As proof, see this - if we add 5 to z, we will get 8, not 1 plus 5, which is equal to 6. Then, if we suddenly decide z is equal to 7, z will not be equal to 1 or 3 anymore.
Python reassigns values to its objects. Therefore, remember the last command is valid, and older commands are overwritten.
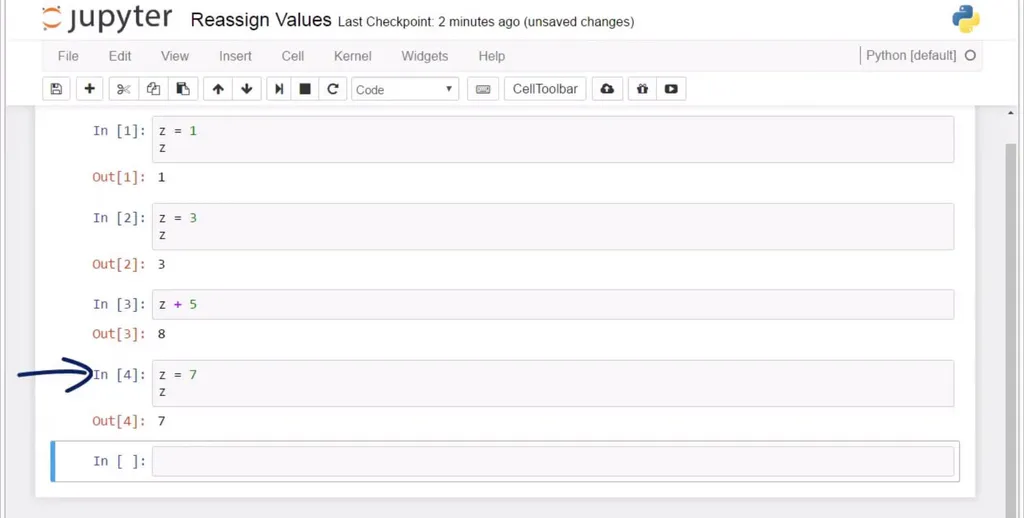
Try to be careful when performing calculations.
We should remember we can only combine numbers and not strings. If you put 5 in quotes here, Python won’t be able to carry on the calculation, and you will be advised to correct the variables you have used as operands. Operands must be of the same data type, in this case – numbers, as integers, floats, or both.
As a side note: If you are interested in learning more about the career opportunities in the field of data science, go ahead and download our free career guide
Add Comments
Especially when your code becomes longer, and by longer, I mean containing tens or hundreds of rows, it becomes difficult to understand how your work has been structured, because there are too many lines.
What you could do in these situations is leave a comment.
Comments are sentences not executed by the computer; it doesn’t read them as instructions. The trick is to put a hash sign at the beginning of each line you would like to insert as a comment. I’ll improvise with a random sentence… “It is just a comment and not code”. When you run this cell, there will be no output, because the comment does not count as code.

Basic Python Syntax - Add Comments
Let’s add code – print 7 and 2 on the same line. Execute with Shift and Enter. Yes, precisely – we got 7 and 2, and the comment row marked with a hashtag produced no output. It remained visible only to the programmer. The computer executed the print command only.
Note: this is the syntax in Python 2. In Python 3, it would be print (7,2). In addition, if you want to learn the differences between Python 2 and Python 3, read our super-comprehensive guide Learning Python Programming - Everything You Should Know.

If we would like to leave a comment on two lines, don’t forget to place the hash sign at the beginning of each line.

Line Continuation
Ok, perfect! I’d like to show you a neat trick that will be extremely valuable when you become an advanced Python programmer and work with large amounts of code. This is a very handy feature, so please pay attention.
Sometimes, the length of the cell will not suffice for you to finish your line. Lines of code could get long.
Or, just for the matter of organizing your code, you might prefer to send part of the code to the next line. So, 2.0 times 1.5 plus 5 could be written in two lines, and the machine could still read it as one command. This could be achieved by putting a backslash where you would like the end of the first line to be. It indicates you will continue the same command on a new line.

Basic Python Syntax - Line Continuation
Cool, right?
Indexing Elements
All right, great! Let’s look at another important basic Python syntax concept that will help us a great deal when working in Python - indexing. This is a technique programmers use frequently, in order to extract certain letters from strings.
So, let's see an example of how indexing works.
Here we have the word “Friday”, right?
Is it possible to extract the letter “d”? Yes, we can do that by using square brackets. And within them, we should specify the position of the letter we would like to be extracted.

Basic Python Syntax - Indexing Elements
A very important thing you should remember is that, in Python (and most languages, with the notable exception of MATLAB), we count from 0, not from 1! 0, 1, 2, 3, 4, and so on. That’s why I’ll ask for the 4th letter, ‘d’, by writing 3 here. See? And we obtained the letter “d”.
Had we put 4, we would have obtained the letter ‘a’. This is the syntax in this occasion – square brackets right after the word, or the string of characters, if you wish, and a number indicating the position of interest.
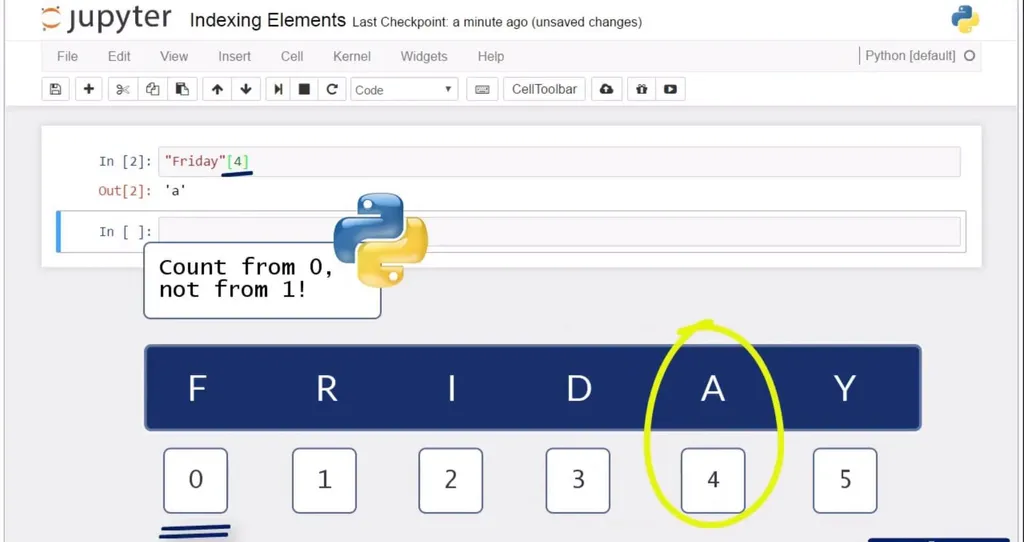
This is how indexing works in Python.
Structure Your Code with Indentation
The next concept for programming in Python we will see here is fundamental – it is called indentation. The way you apply it in practice is important, as this will be the only way to communicate your ideas to the machine properly. This is central to the Python and distinguishes it from many other popular programming languages. Here is what I mean.
Let’s define a function “five” that takes as an argument an unknown x. It will be a simple one – x will be reassigned the value of 5, and the function will return the value of 5 for us.

Please note that I am using an indent.

Now, we can print the result of five with an argument of 3.

Nothing happened. Why? Because printing five of 3 is within a function, so it will be executed only when the function is applied.
If we place print on a new line, instead, aligned to the def command, the output will be different.
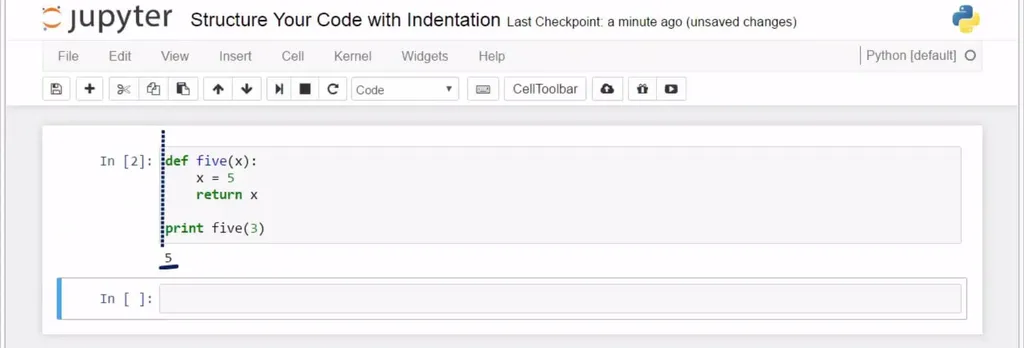
How come? The print command is executed on its own, not as part of the five function. Def and Print form two separate and, written in this way, clearly distinguishable blocks of code or blocks of commands.
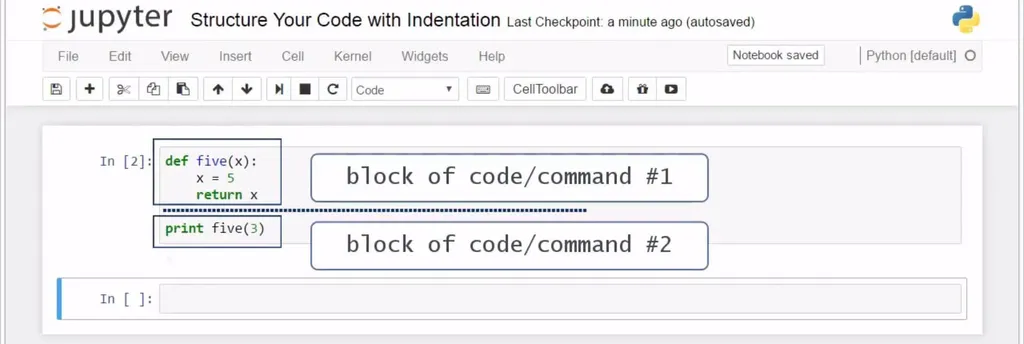
Python syntax - Structure Your Code with Indentation
And it makes sense to use indentation, doesn’t it? Everything that regards the function is written with one indentation to the inside. Once you decide to code something else, start on a new line with no indentation. The blocks of code are more visible, and this clarifies the logic you are applying to solve your problem.
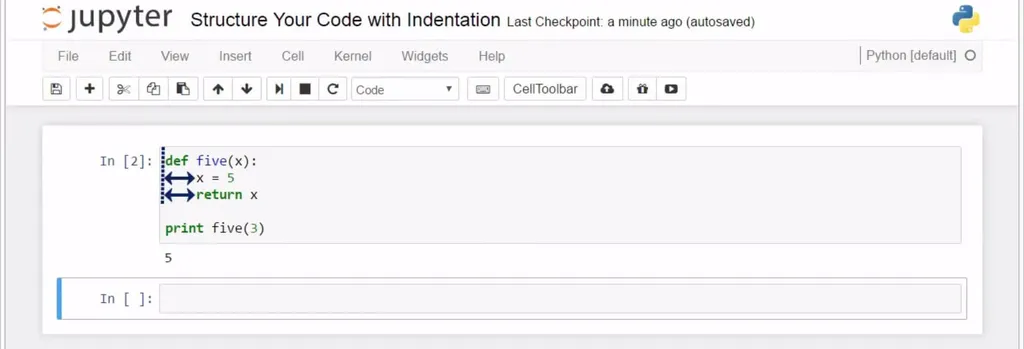
Basic Python Syntax - Indentation
Arithmetic Operators
Let's check out the arithmetic operations in Python. They are very intuitive.
The addition and subtraction signs are straightforward to use. Technically speaking, in the equation you see below, 1 and 2 are called operands, while in the next one, the operands are 3 and 5. The plus and minus signs are called operators, and given they also represent arithmetic operations, they can be called arithmetic operators.
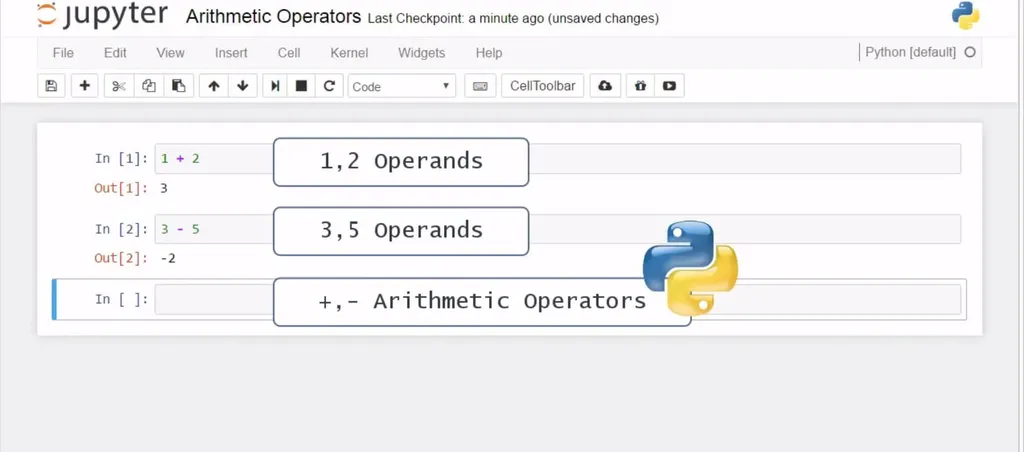
Division is more interesting. If we want to divide 15 by 3, we will need to use the forward slash sign.
It's interesting to see what will happen if we try to divide 16 by 3? What we will get is 5 once again! Yes, the output was 5 because, in Python 2, the quotient is an integer by default.
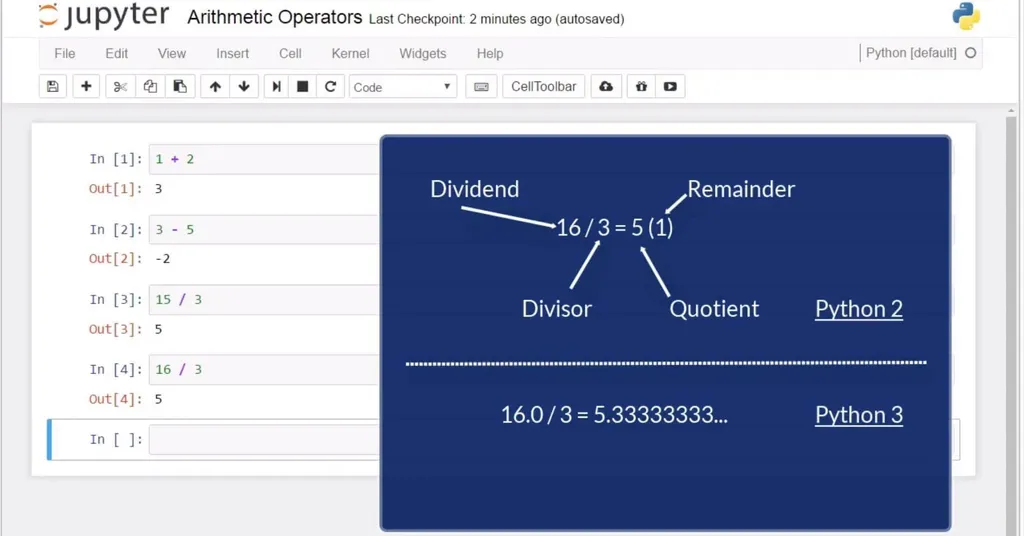
Mathematically, if we divide the integer 16 by 3, we will obtain a quotient of 5 and a remainder of 1. If we use real numbers, or floats, the float 16 divided by 3 will result in a float value of 5.33.
Therefore, we obtained as a quotient the integer 5 and no information regarding the remainder of the division of 16 by 3.
This is one of the few substantial differences between Python 2 and 3. In Python 3, you would immediately get 5.33 as an answer, or a float, because the software will understand your first number was a float value. To avoid this, when we use Python 2, we should look for the quotient of the float 16 divided by 3 and not of the integer 16 divided by 3. So, we should either transform the number into a float or type it as a float directly.
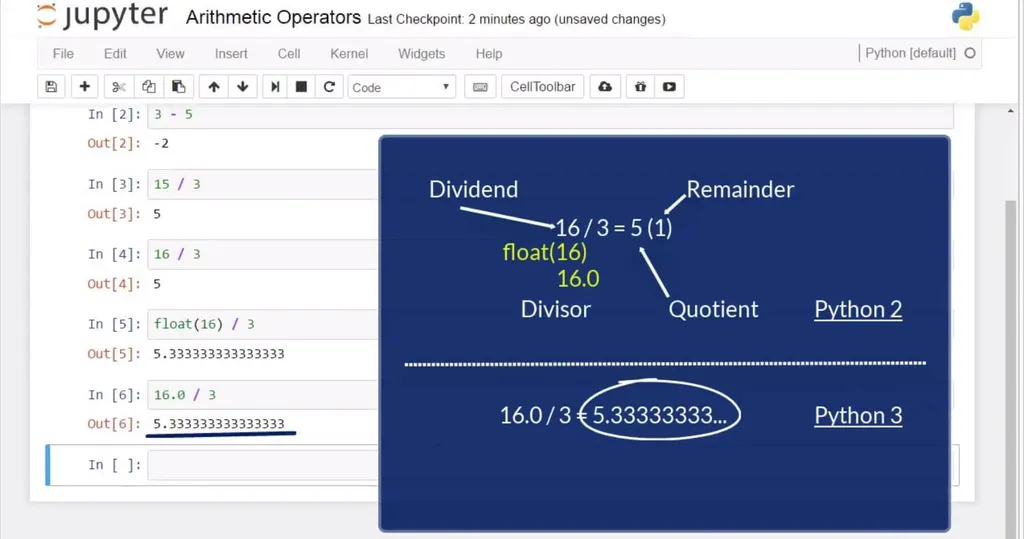
See? This is the correct answer.
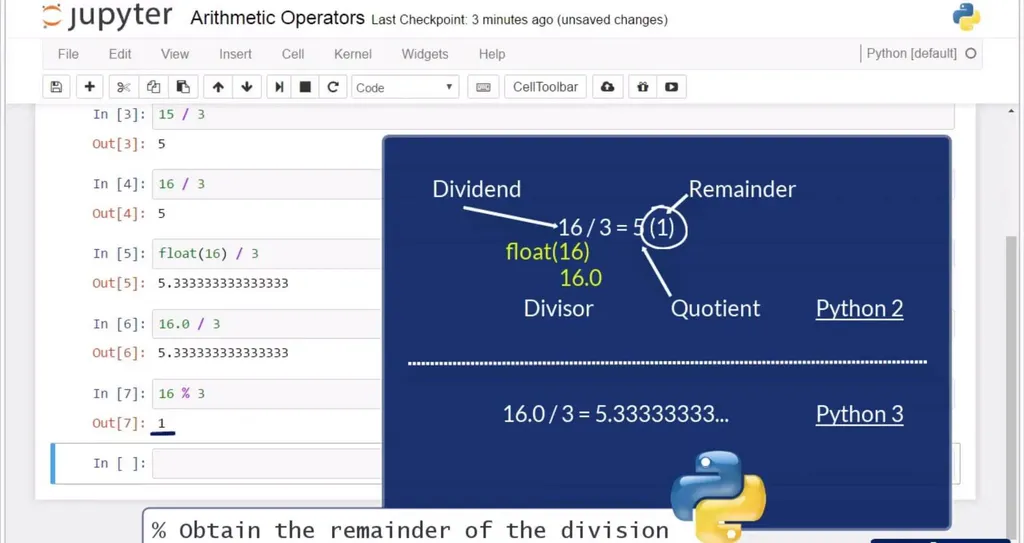
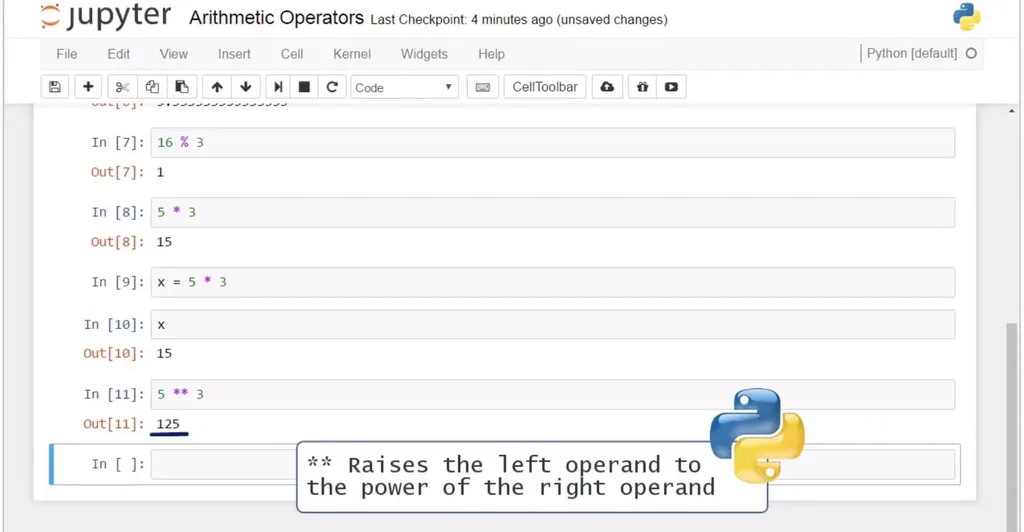
Now, let’s obtain the remainder of the division of 16 by 3. How can we make Python produce “1” as an output in this cell? The operator that can help us is the percentage sign. I’ll type 16, percentage sign, 3, and when I execute the command, I will obtain the remainder. The answer we received is “1”. Good.
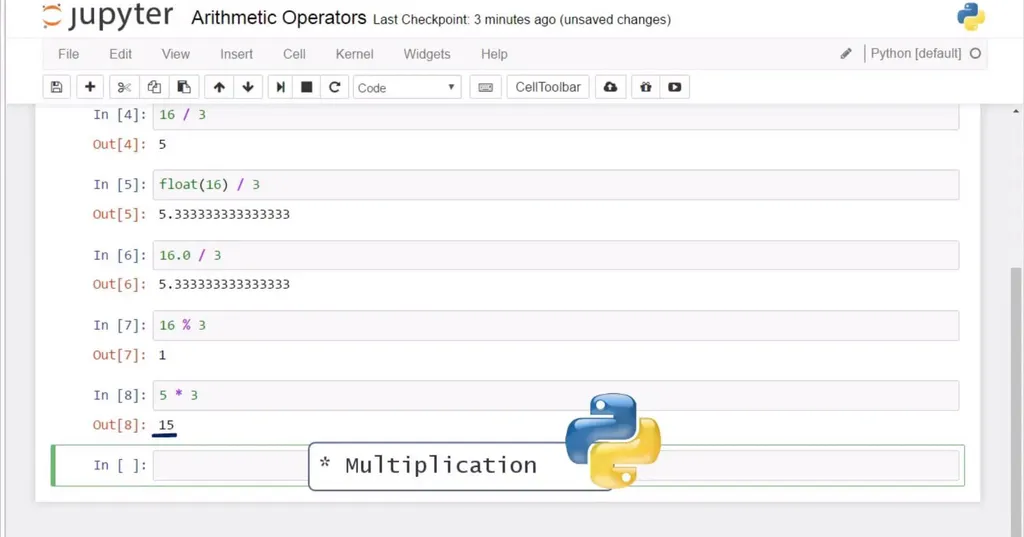
Multiplication. As usual, we can use the star sign when we want to multiply. For example, 5 star 3 will lead us to an output of 15.
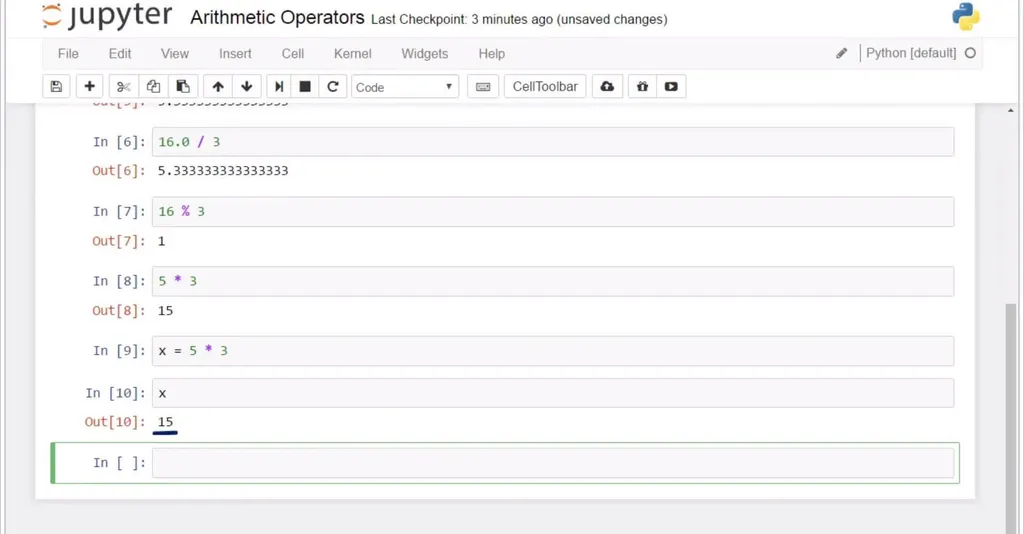
For the record, you can assign any arithmetic operation to a variable. If we assign 5 times 3 to the variable x, and then we call x, we will obtain 15 again. Great!
Powers. How could you calculate 5 to the power of three? By using the double star operator. Type 5, two stars, 3, and … here you go – 125! Easy, right?
Comparison Operators
Now we will learn about the comparison operators.
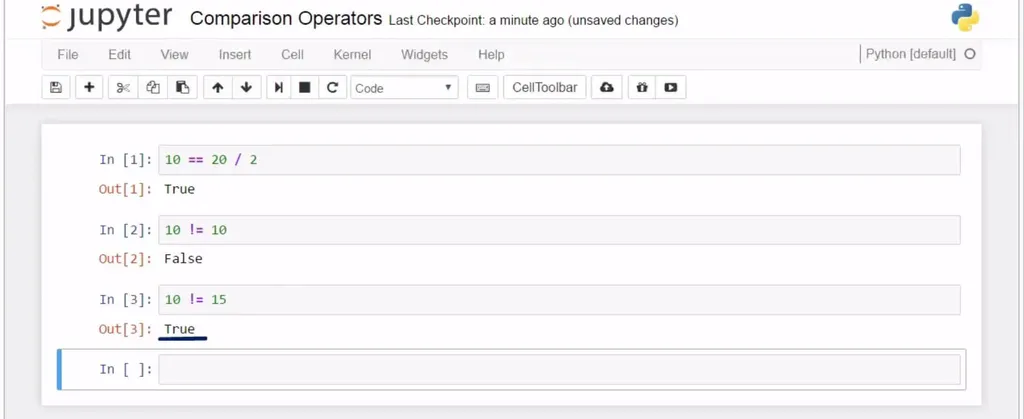
We said, if we type the equality sign twice, we can verify the left and right side of an equality are equal.

Well, if we use an exclamation mark and an equality sign, then we could verify if two sides are not equal. So, it would be false to say 10 is not equal to 10, and it will be True that 10 is not equal to 15. If we use an exclamation mark and equal, and the two sides we are comparing are 10 and 15, we’ll obtain True, as we wanted to verify they are not equal.
Good. What is next? “Greater than” and “less than”. We can use the well-known symbols to test if a value is greater or smaller than another value.
Is 100 greater than 50? Yes, it is.
Is it smaller? No, it is not.
And that’s why we get “False”. That’s great!

The logic behind checking whether an operand is greater than or equal to, and less than or equal to, is the same. Don’t forget that, on the right side of the operand, we are not limited to providing only one number, like ten. We could insert an expression, like 10 + 10. So, is 15 greater than or equal to 10 + 10? No.

Is 15 less than or equal to 10 + 5?

Well, that is true.
Great! This covers everything we can possibly say about comparison operators, which are definitely in the list of basic Python syntax you need to remember. Now, let’s see what is intended with the expression logical operators, also known as Boolean operators.
Logical "Boolean" Operators
Briefly, the logical operators in Python are the words “not”, “and”, and “or”. They compare a certain amount of statements and return Boolean values – “True” or “False” – hence their second name, Boolean operators.

Basic Python Syntax - Boolean Operators
Let’s start by providing an example with “and”.
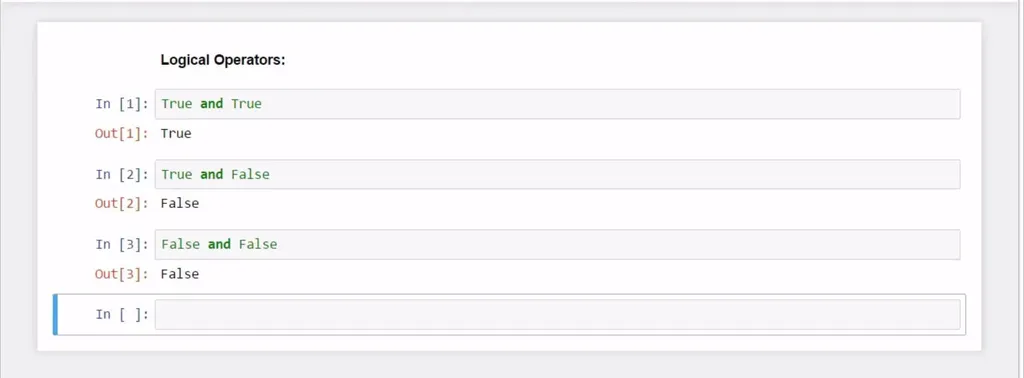
“And” checks whether the two statements around it are “True”. Let’s use only the Boolean values “True” and “False” for now. “True” and “True” will result in “True”, while “True” and “False” gives as an answer “False”. “False” and “False” will naturally bring us to “False”. Ok.
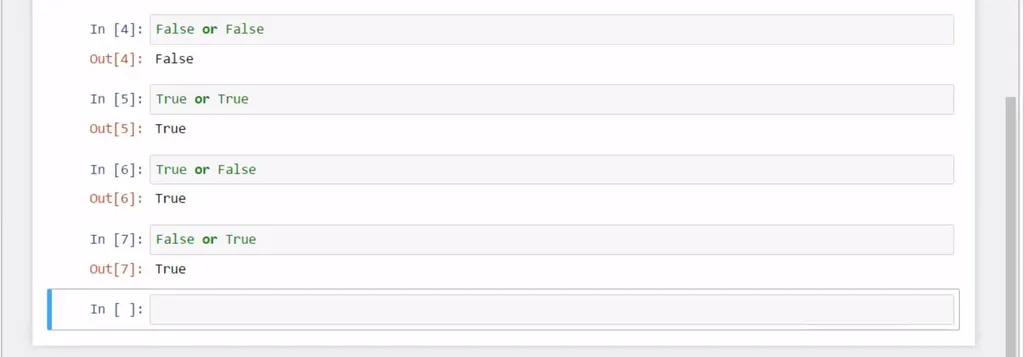
“Or” checks whether at least one of the two statements is “True”. Hence, “False” or “False” will come back as a “False”, whilst “True” or “True” will return “True”. In this cell, “True’ or “False” will return “True”. The order in which we have the two statements does not matter, so “False” or “True” will still result in “True’, as well.
The way “Not” functions is it leads to the opposite of the given statement. “Not True” leads to “False”, “Not False” leads to “True”.

Let’s see a slightly different example. The idea is to show you in this cell that the Boolean operators can be applied not only to Boolean values. The statement “3 greater than 5” is “False”, while “10 less than or equal to 20” is “True”. “False and True” entails “False”, and this is what we obtained.


The fun starts when you combine these logical operators. In these occasions, you must respect the order of importance of these three operators. It is: “not” comes first, then we have “and”, and finally “or”. The examples in these 3 cells will help you get the right intuition.
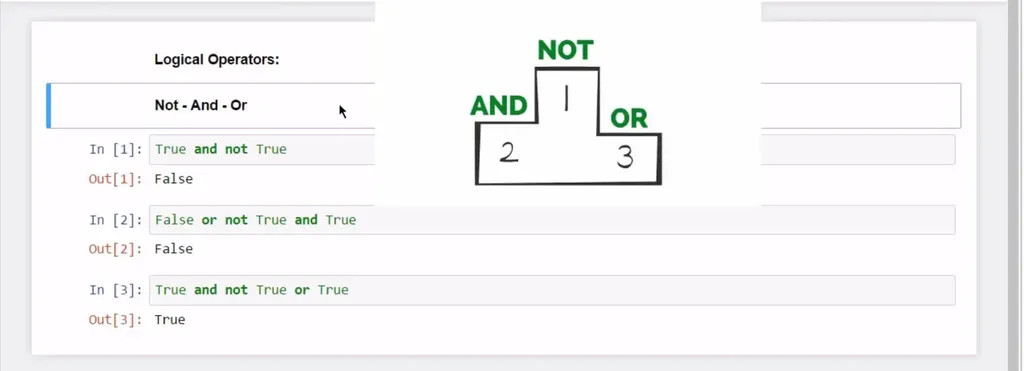
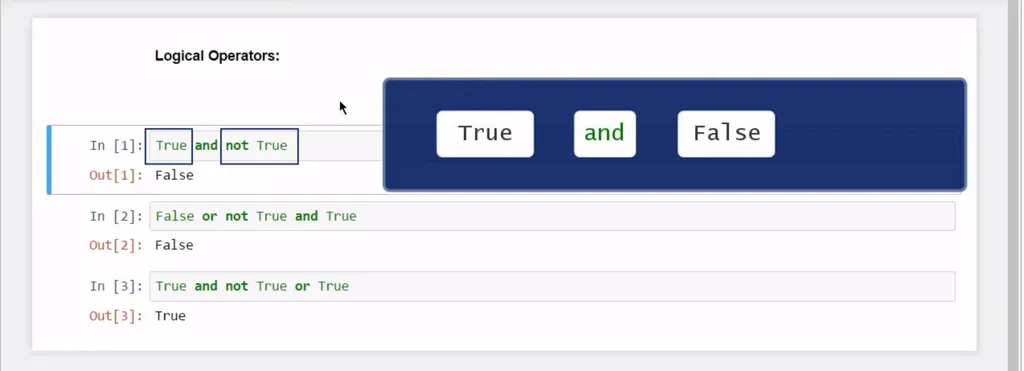
In the command “True and not True”, we should first consider what the operator “not” will do.
It will be applied to the value “True”. And “not True” means “False”. Therefore, what’s written in this cell must be interpreted as “True and False”. Now, the remaining operator “And” can be applied. “True and False” leads us to False. Let’s run this cell. The answer is correct – “False”.
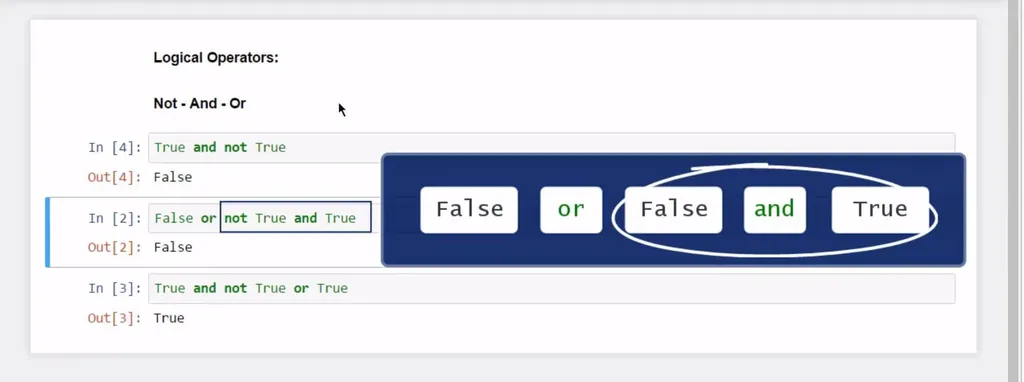
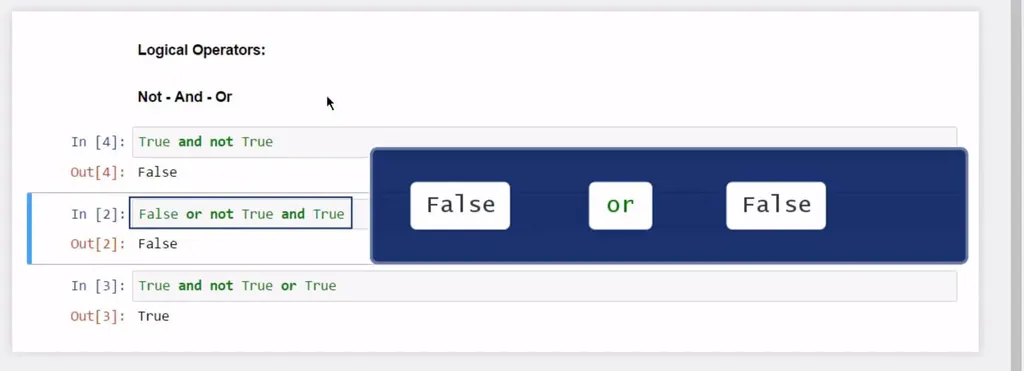
Let’s do an example with all three Boolean operators. “False or not True and True” logically is the same as “False or False and True”, because before anything else, “not True” must be read as “False”. Then, “and” has an advantage over “or”. This is why we will concentrate on the phrase “False and True”. Its outcome is “False”.
We are now left with “False” or “False”. Both values are “False”, which always leads to “False”. Execute with “Shift and Enter” and… as expected – “False”!
To solidify the concept, let’s go through another similar example. “True and not True or True” is the same as “True and False or True” because initially, “not” mattered most.

Now, “And” will convert “True and False” to “False”. Now, we can think about the remaining “False or True”.

Because the “or” operator needs at least one “True” statement to return “True”, our result after running this cell will be… “True”!
Great! Let’s see what identity operators are about.
Identity Operators
The identity operators are the words “is” and “is not”. They function similar to the double equality sign and the exclamation mark and equality sign we saw earlier. Let’s illustrate their application with the following examples.

Python syntax - Identity Operators
If we say 5 is 6, we’ll immediately understand it is false, the same as if we wrote it like this, with the double equality sign.

If we said “5 is not 6”, that’d be True, and it will be the same as if we wrote, “5, exclamation mark, equals 6”.

Great, you have learned a lot about basic Python syntax and operators.
Our next goal would be to introduce you to some basic Python functions for beginners. Follow the link and I'll see you there!
***
If you’re enthusiastic about boosting your Python knowledge, check out our Python Programmer Bootcamp.

