Installing MySQL
This post will be a little technical, a little bit complicated, but very important – we will be installing MySQL Workbench and a MySQL Server. You’ll need both in almost every post of our SQL collection: SQL INSERT Statement, SQL UPDATE Statement, SQL DELETE Statement, SQL Best Practices.
Let’s look at MySQL’s official website.
Select the “Downloads” section and click on “Community”, as we would like to show you how to download a file that is open-source and free.
We will go through the installation process for a machine operating on Windows, but please remember the post will be useful if you are installing MySQL on a machine running on Mac OS or Linux, as what needs to be done is similar.
So… I’ll click on “MySQL on Windows”.

You can either download MySQL components and tools separately or download the MySQL installer then choose which tools you would like to install from there. The second option is much quicker and easier to implement. That’s why we will select the Installer.

Scroll down to where you see two versions of the installer. Before discussing them, please pay attention to this important note.
MySQL Workbench, its installer, and all software tools are constantly being updated to solve different bugs and whatnot. This is why, during the installation process, we can be left with the impression that the components we are installing are different versions. This is not an issue. Usually, the changes between different versions are marginal. That’s why they would not affect the execution of the tasks presented throughout this post.
So please, if you are about to download a version of MySQL that is older or newer than the one you see in this post, remember to apply all code used in our SQL posts and exercises without experiencing issues.
Now that we said that, let’s focus our attention on the two options provided. The first one is suitable for those of you who have an internet connection (throughout the installation process).

The second will be appropriate if you will just download the file and then install the software when you are offline. Naturally, the first one is better. Select the relevant “Download” button.
A page offering you to log in or sign up for an Oracle Web account will open. This is not an obligatory requirement, so you can press “No thanks, just start my download.”

Then, a new window will pop up. Select the directory where you would like the installer file to be downloaded. When you’ve done that, click on “Save”.

We don’t need the MySQL page anymore. So, you can open the installer and wait for it to load.
As this is happening, depending on the version of your operating system and its settings, you might get a message asking you to allow certain apps to make changes to your device. Please, agree and continue.
Then, a prompt box will appear asking you for an update. You don’t need it at the moment, so please press “No”.
Right!
This is the MySQL Installer window. “To proceed you must accept the Oracle Software License Terms”. You can do this by ticking this little box at the bottom of the window and then clicking on “Next”.

What comes up are a few different Setup Types. We need not discuss all of them. For our purposes, “Custom” will allow us to specify the tools we need. So, let’s select “Custom” and click on “Next”.

Ok. At this stage, you can select the products to be installed. Here you will find a PDF file explaining why we will need “MySQL Workbench” and a MySQL server.
First, expand the Applications section, then the “MySQL Workbench” subsection, and then click on the name of the tool and on the little green arrow to move it to the section of products or features to be installed.

Now, we must add a server. Expand the “MySQL Servers” section, then the “MySQL Server” subsection, and finally choose one of the two versions – the 64-bit or the 32-bit (which is called X 86). I will be coherent with the Workbench feature, so I’ll select the 64-bit version.

We are done selecting features. Click on “Next” to move to the next stage of the installation process.
Press “Execute” to install Workbench and the MySQL Server package.

Once this is done, the status of both features will be marked as “complete”. This means we are ready to proceed. Let’s click “Next” again.

You’ll move to the stage of product configuration – the last step of the installation process. The status of the Server should become “Ready to Configure”. This means you can move a step further.

Now, you will adjust the configurations of your server. We need not go into details. Keeping the default settings in the next two pages will let us install a version that will suit the purposes of our SQL posts. So, just click “Next” two times.


This step is crucial, and it must not be overlooked! Here, you are being asked to set up a root password. And you mustn’t forget your password, because it will be hard to change or recover it later. Otherwise, “root” refers to the main connection established between you, as a user and the MySQL server you are about to install.

Press “Next” once more, and…
Keep all the settings that just appeared as they are, especially the ones regarding the start of the MySQL server at System Startup. Unless you leave this option ticked, you must set up the server manually when you use SQL, and that’s not a straightforward operation.

Ok, press “Next” again.
You will be offered to install a plug-in that contains improvements on previous versions of Workbench, but it will not be relevant for us right now. So, please skip this step by clicking “Next” once more.

And… finally… “Execute”!

Wait until the installation is complete and click on “Finish”.

You won’t need to go through the wizard that appears, so click 'Next'.

Then, leave the tick on “Start MySQL Workbench after Setup” and press “Finish”.

Now, Workbench will load and you can set up a connection between Workbench and the MySQL Server.

We’ll learn to do that in the section "Setting up a connection".
The Client-Server Model
In this PDF file you will find a visualization that explains which MySQL features we must install and why.
The program we will be working with in this post is called MySQL Workbench. It is the Oracle visual tool for database design, modelling, creation, manipulation, maintenance, and administration. Professionals refer to this type of software as “Integrated Development Environment” or IDE. So, Workbench will be our IDE.
And, if you wonder what Oracle is, this is the software company that owns the MySQL version of SQL.
You could also wonder why we would need a server. Sticking to the basic theory of operation of computer networks, MySQL Workbench acts as a client program – a client of a MySQL Server. The server is, practically, nothing more than a machine that provides data and services to the same or other computers. The data could be provided locally or online. Regardless whether the server is installed locally on your computer or is being accessed remotely over the internet from another computer, you will need a Server to use MySQL. In our case, we installed the server locally.
Briefly, the server will perform all calculations and operations you execute in Workbench. You will be writing queries through the Workbench interface, in the form of raw code, which MySQL server understands and processes. Finally, when it finalizes its calculations, it will bring the respective results back to you in the form of an output displayed on your screen.
Setting up a connection
All right!
MySQL Workbench is the official Graphical User Interface tool, or GUI tool, for MySQL. This means it will be the tool that will show us “communication” with the MySQL server.

First, to access Workbench, we must set up a connection between your GUI and the MySQL server. Otherwise, the two will not be linked, and you cannot execute any code.
A connection has been created for you.

Click on the rectangle you see here then insert the password you designated during the installation process. Press “Ok” and… here you go.

Now you can use the MySQL Workbench!
Getting acquainted with the interface will be the focus of our next section. Before doing that, I would like to tell you that you can load more than one connection at a time in your GUI. All connections will be under different tabs, next to the house in the upper left part of the screen.

Should you press the house icon, logically, you’ll immediately jump to the main tab, showing your MySQL connections. We can see just one. Ok.

If you want to go back to the connection already loaded, you must click on its name. And, to close it, just press this little close sign.

If you need to set up a connection, you must press the little “plus” sign on the right side of the “MySQL Connections” label.

In the window that pops up, you will see several empty fields. The first one is compulsory, as the text inserted will be the name of the connection you are about to establish. Then, you can click on “Test Connection” to see if, after typing the password assigned in advance, the connection works.

Once the connection is correctly set up, another rectangle will appear on the home screen, and you’ll be able to access Workbench from there.

In this post, you won’t have to set up a connection on your own, as you’ll need the default connection that’s already been set up. Stay tuned for the next section, where we will study the main characteristics of the MySQL Workbench interface.
Introduction to the MySQL interface
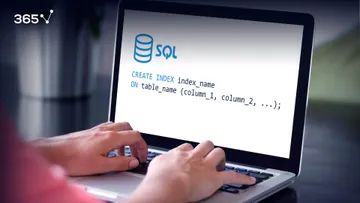
Ok, as you can see here, the central part of your screen is where you can create queries or SQL objects. In simple terms, it will be the area where you will be typing code.

For example, I can type a line of code that will select all records of a table contained in a database.

Here, you can see a small set of icons executing various functions.

By clicking on the first one, you can get to a window from which you can select and open an existing SQL script.


The second icon allows you to save the script on your computer and so on.

The functionalities of most of the remaining icons in this set will be explored in the other SQL posts that we have. An important icon to remember is the one depicting a lightning. By pressing it, you can execute or run the code you’ve written.

Let’s try this.

A new block appeared in the middle of the screen. It is called the “result grid”, although more often, you’ll hear people referring to its content as the “result set”. Obviously, here, you can see the data obtained after running the code we’ve written. It is accurate to say that, in the middle part of the screen, you can see the results obtained after executing your query.

Finally, to close the result set, you must press the cross sign on the tab indicated below.

At the bottom of the screen, we can see the output section.

It keeps track of all successfully or unsuccessfully executed operations in MySQL in a given session. For instance, we obtained an output last time, didn’t we? That’s why we see a little green circle with a tick mark over here and the number and time of the operation executed. You can see the exact action undertaken, a message from Workbench regarding this operation, and the time it took the server to reply to your query with an output.

On the left part of the screen is the “Navigator” section.

It is relevant for advanced analysis and for more advanced database maintenance sessions. The subsection we will care about most is the schemas section.

It represents all available databases, their tables, and other related SQL tools and features. The upper right part of the screen contains three little squares that will allow you to hide or show the navigator, the output section, or the SQL Additions section where we can find more advanced features if necessary. You can use these buttons to adjust the program’s interface according to your preferences.

Finally, beneath the section with connections tabs, we can see a few small icons. They allow us to add various types of files and objects, in our posts, you will often need the first two.

When you hover over an icon, workbench displays an explanation of what it does. As it says here, it will create a new SQL tab for executing queries.

So, let’s press this icon.

You see? A new SQL tab opened. This is the place to start a new SQL script from scratch. Now that you have more than one SQL tab open, you’ll need a single click over a tab’s name to jump from one SQL script to the other.

The second icon takes you to a window that allows you to select and then open existing SQL scripts.

Throughout our posts, you will often need to use this icon. Whenever we ask you to load a certain SQL script, you must click on that icon, go to the directory where you’ve stored the respective SQL script, select it, and then press the “Open” button.

This was an introduction to the main characteristics of MySQL Workbench. Please, play around with its interface. Then have a look at the SQL insert statement in the next tutorial.
***
Eager to hone your SQL skills? Enroll in our SQL course.
Next Tutorial: SQL INSERT Statement
FAQs
mysql -u root -p
Enter your password when prompted. This opens the MySQL command-line client.
sudo apt update
sudo apt install mysql-server
sudo systemctl start mysql
After installation, run sudo mysql_secure_installation to configure security settings. You can then log in with:
sudo mysql -u root -p
1. Make sure you installed MySQL Server during the setup—not just Workbench.
2. Open MySQL Installer, go to the Products tab, and confirm that “MySQL Server” is listed and running.
3. If not, click Add, select MySQL Server, install it, and complete the configuration steps.
4. After that, restart Workbench and create a new connection using the correct root password.
This ensures the Workbench can detect and connect to the server properly.